Time Lapse Photography
Camera:
Yet again, the fantastic GoPro HD Hero2 provides a simple solution with its time lapse photo setting but it is not the only available option. For example, Canon's TC-80N3 Timer Remote Controller plugs into many of their DSLRs and lets you control not only interval between frames but exposure duration when doing long exposures of the night time sky.
Tripod:
You will need a sturdy tripod. Take care to level it. You don't want to have to rotate hundreds of individual photos in post if you can help it.
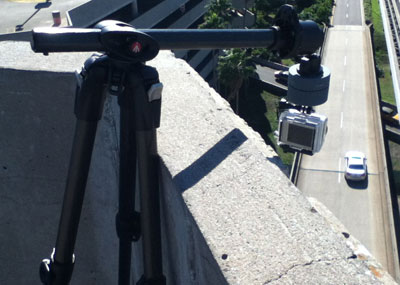
Most time lapse photography you've seen is taken from a fixed position with the action unfolding over time. Flower buds opening is a popular example that actually allows you to better control lighting for consistent exposure. If you've ever sat in an airplane waiting to take off, you've probably seen the nature series of time lapse photos where the camera position pans slowly through the series of photos while the sun and clouds race across the sky. If you are using the Hero2 (or any camera that weighs less than 1 lb.), there is a relatively inexpensive device available to do those pans.
I ordered the Camalapse from pointofviewcameras.com. It is basically a smooth running, horizontal wind-up kitchen timer with a tripod mount that does one full rotation in one hour. Combine this with the time lapse capabilities of the Hero2 and you can recreate those smooth pans of clouds rushing over a landscape. It is a clever solution and is light weight (4 oz).
Please note that the Camalapse product video is deceptive. Camalapse only winds clockwise and rotates counterclockwise yet 2 of the 4 sample clips on their product video shows rotation of left to right. Camarush's response is that these clips were reversed in editing which won't do for many uses. For example, if you want to track the movement of the sun and clouds across the sky, you would have to orient the camera northward for a left to right rotation to work. When reversing the video sequence won't work, you have to suspend Camalapse and camera upside down and flip the video vertically (a Hero2 setting option or do it in editing). If you use a tripod that can invert the center shaft, you are limited to a rotational angle between the tripod legs. If your tripod can mount the center shaft horizontally, you can use enough mounts to rotate 90 degrees and suspend the Camalapse upside-down that way. You could also make a bar that threads into the top of a typical tripod that lets you offset the Camalapse enough to mount the camera upside down and suspend it. Just take care to not do this on a small tripod where you shift the weight to the tipping point. To prevent that, you could offset a longer bar to act as a counter balance. My disappointment is that they went to great lengths to imply what the Camalapse can do without disclosing the limitation.
Number of Exposures:
Now its time for some basic math. First you need to determine the total amount of time you want to span. If you are using the Camalapse to pan, you can rotate 90 degrees in 15 minutes or 180 degrees in 30 minutes. Next you need to have an idea of how fast, and how smooth, you want the series of photos to play back. This will tell you how many shots you need. Here is an example:
- For a 15 minutes event duration at roughly 30 frames per second for NTSC video, that equates to 27,000 frames (15*60*30) played back at normal speed.
- Plan to have each image playback for as little as 2 to 4 frames of video as a starting point.
- If you capture a still image every 5 seconds, the series will have 180 images ((15*60)/5). At 4 frames per image, this would playback in 24 seconds (180*4/30).
Constant Exposure:
Just as you would do when shooting a series of photos for stitching together into a panoramic image, you want a constant exposure and aperture. This is an advantage of a more sophisticated camera like a DSLR. If you are using a Hero2, you can approximate a consistent exposure by selecting spot metering in the settings menu. Graduated neutral density filters can also help.
Image Ratio:
If this is for internet video only, the ratio of the images doesn't matter as much (4:3, 3:2) but if your end result is for display on your flat panel TV, you will want to end up with 16:9. If you can, select 16:9 up front so that you don't have to crop hundreds of photos later. If you are using the GoPro, you can crop the series in your photo editor first but I find it easier to scale the photos in a non-linear editing (NLE) application. For me, that would be FCPX. Effects such as scale, color balance or exposure adjustments can be made to one clip and pasted into the others.
Making the transition to video:
Import your photo series and drop them into the timeline. In FCPX, I can select all and change their duration from the default of 10 seconds to something much shorter. As noted above, I find that setting each still image to a playback duration of 2 to 4 frames yields the best results. If you hold each image too long, motion will appear choppy. If it is too short, the motion will be very fast.
There isn't a single solution as there are too many variables, subject matter included, but this should give you a good starting point.
Sample Clips:
I've posted 6 sample clips from the GoPro HD Hero2. A title page before each clip provides technical details.